Surface Finishing for Automotive and Motorsport Industries
Today's world has seen significant advancements in the automotive and motorsports fields. The creation of a vehicle is an impressive showcase of engineering practises, which requires careful design and precision machining. As the most competitive sector in manufacturing and technology, this field necessitates persistent validations for improvements as well as safety.
To comprehend the meticulosity of engineering work in the automotive industry, it is essential to understand that many small components come together to create a final assembly, and each part has a unique role in the smooth operation of the entire system. For instance, a car's engine, transmission, braking, suspension, and steering system work in tandem, allowing the vehicle to move effortlessly on the road. Breaking down these significant components reveals the meticulousness of the work required. For example, in an engine, the opening of the valve, functioning of the fuel injector, movement of the piston, crankshaft, camshaft, and ignition of air-fuel mixture all require precise calculations to ensure the engine performs flawlessly.
The requirements for different components vary depending on their functionality. In some cases, airtight contact is necessary, such as with intake valves, exhaust valves, piston and cylinder walls. However, in other areas, a little roughness may be acceptable, such as with the housing of various components. Neglecting microscopic finishing levels can lead to assembly failure, making it critical to maintain high finishing standards.
“When it comes to racing, every millisecond counts. That's why having Kemet lap and polish your critical components can help you gain the winning edge by a thousandth of a second!”
In motorsports, components must perform optimally under extreme conditions, such as high torque levels and speeds. Metal surface interactions in such circumstances can result in overheating, power loss, and ultimately, catastrophic failure if appropriate standards are not met.
By utilising proper manufacturing techniques and adhering to rigorous industry standards, we can achieve excellent results. Even microscopic abnormalities, like excess material or contaminants, can hinder vehicle performance. Kemet provides the confidence and trust necessary by finishing components to the highest possible standards, ensuring that they are ready for racing events like Formula 1 and NASCAR. Utilising the best machining techniques and equipment sets you apart in the racing world.
Advanced manufacturing methods and equipment can reduce friction, improve efficiency, maintenance, and durability, as well as increase component longevity. Ensuring the quality of the following components is critical for a vehicle to excel in the racing world, with racing engines requiring high-end parts, including camshafts, crankshafts, tappets, valves, pistons, rocker arms, braking systems, such as discs, disc pads, and drums, transmission components like clutches, gears, differential, and pressure plates, and the steering system.

During machining operations, some irregularities or non-uniformities, known as peaks and valleys, may remain on components. Although these peaks and valleys are microscopic and not visible to the naked eye, they can have detrimental effects on mechanical operations where two components are in close contact with each other. This is why certain components require an extremely high finish, as failure can occur if the quality is not up to standard. To achieve a high degree of flatness and surface finish, a process known as lapping is used.
High-Quality Automotive Parts Finishing with Precision Techniques
To ensure that an engine is functioning properly, precise measurements must be taken into consideration, as even microscopic roughness can cause a component to fail.
In a vehicle, many components require a high degree of finish, including the transmission system. The flywheel, which has a clutch plate and pressure plate mounted on it, serves as a mode of power transfer, and a smooth transfer of power from the engine to the transmission is ensured by the finish between these surfaces, which requires a lapping process. Similarly, the brake disc must have a good finished surface.
The lapping process is also crucial for smaller components of an engine, such as the seat ring and wedge of the valve, which must be lapped to sit perfectly and prevent leakage. The camshaft, which operates the intake and exhaust valves, requires a high surface finish, as do the pistons and piston pins. Any roughness on these components can cause the engine to run less smoothly, with hesitation in the conversion of power from linear to rotational. Similarly, components such as spray nozzles, injectors, hydraulic pumps, and impellers require a high degree of finishing process, like lapping, for a smooth workflow.
The table below shows the finish standards for engine and vehicle-driven components. Although these values can be considered as a standard for different components, it is important to remember that values may vary between different companies.
| Component | Acceptable Roughness (Micro inches) | Manufacturing process |
|---|---|---|
| Cylinder bore | 16-20 | Honing |
| Tappet bore | 60-75 | Reaming |
| Main bearing bore | 60-80 | Boring |
| Head surface | 40-50 | Milling |
| Piston skirt | 45-55 | Lapping |
| Piston bore | 30-38 | Lapping |
| Piston pin | 9-12 | Lapping |
| Crankshaft Main Journal Bearing | 4-6 | Lapping |
| Crankshaft Connecting Rod Journal Bearing | 4-6 | Lapping |
| Camshaft Journal Bearing | 4-6 | Lapping |
| Camshaft | 15-20 | Lapping |
| Rocker Arm | 14-20 | Lapping |
| Intake valve stem | 34-38 | Lapping |
| Intake valve seat | 25-40 | Lapping |
| Exhaust valve stem | 18-20 | Lapping |
| Exhaust valve seat | 34-45 | Lapping |
| Tappet Face | 4-5 | Lapping |
| Hydraulic lifter | 22-25 | Lapping |
The standards become even more stringent for high-performance vehicles. The table below displays the standards for automatic transmission, clutch, and braking systems. When any of the moving components fail prematurely, it is often due to insufficient surface inspection. The standards for different engines vary depending on their requirements. For instance, a recent study demonstrated that diesel engine piston pins with a surface finish of 6 or 5 micro inches failed quickly, but a finer finish of 4 micro inches performed well. On the other hand, the required standard for surface finish in petrol engines is 9 micro inches.
| Automobile Driven Components | Acceptable Roughness (Micro inches) | Manufacturing Process |
|---|---|---|
| Front Pump Journal Shaft | 18-22 | Lapping |
| Front Pump Shaft Thrust surface | 11-14 | Lapping |
| Reverse Gear Drum – Braking surface | 150-170 | Turning |
| Intermediate Shaft Journal no1 | 6-7 | Lapping |
| Intermediate Shaft Journal no2 | 50-60 | Lapping |
| Central main shaft journal | 23-27 | Lapping |
| Central Main Shaft Thrust Surface | 20-30 | Lapping |
| Output Shaft Journal no1 | 14-16 | Lapping |
| Output Shaft Journal no2 | 10-15 | Lapping |
| Output Shaft Journal no3 | 27-32 | Lapping |
| Front Drum – Braking Surface | 90-110 | Turning |
| Clutch Plate | 16-24 | Turning |
| Main shaft Journal No1 | 20-25 | Lapping |
| Main Shaft Journal No2 | 25-30 | Lapping |
| Low Range Reaction Member – Thrust surface 1 | 35-40 | Lapping |
| Low Range Reaction Member – Thrust surface 2 | 65-75 | Lapping |
| Front Drum – Braking surface | 90-110 | Turning |
| Brake Drum – Front | 65-75 | Turning |
| Rear | 75-85 | Turning |
| Clutch Pressure plate | 40-50 | Turning/Lapping |
| Kingpin | 6-8 | Grind |
| Universal Spider Race | 14-16 | Grind |
Efficient Automotive Component Deburring for Superior Performance
Deburring is an essential process in the automotive industry that involves the removal of burrs or small protrusions left on metal components after different mechanical operations. These burrs not only affect the appearance of the component but also disrupt its functionality, affecting the performance and lifespan of the part or assembly. To ensure the longevity and proper functionality of the machined parts, it is essential to remove these burrs using different techniques.
Manual deburring is a traditional method of removing burrs, which involves experienced workers using hand tools to remove the burrs. This process is time-consuming and labour-intensive, and the quality of the deburred part may not match the quality of automated processes. Machine deburring, on the other hand, involves using different types of machines, including grinding and CNC machines, to remove burrs. This process is expensive but produces high-quality machined parts.
Thermal deburring is another method that uses high temperature and pressure to melt the imperfection and remove the burr. Electrochemical deburring, on the other hand, uses electrochemical energy to remove the burr and is useful for working with challenging metals.
The automotive industry performs various mechanical processes on components, such as casting, forging, and milling, which leave behind rough surfaces known as burrs. The precision required in the transmission system allows no allowance for rough surfaces or burrs, as they can break off during operation and damage the system. Engine blocks, which are typically made through casting, also generate burrs that must be treated to maintain the aesthetic and practicality of the part.
Other components that require deburring include axle shafts, differentials, valves, transmission housing, engine parts, and more. One effective tool for deburring is the Xebec deburring brush, which features ceramic fibres that can easily remove burrs and improve the surface finish of machined components.
Transmission case
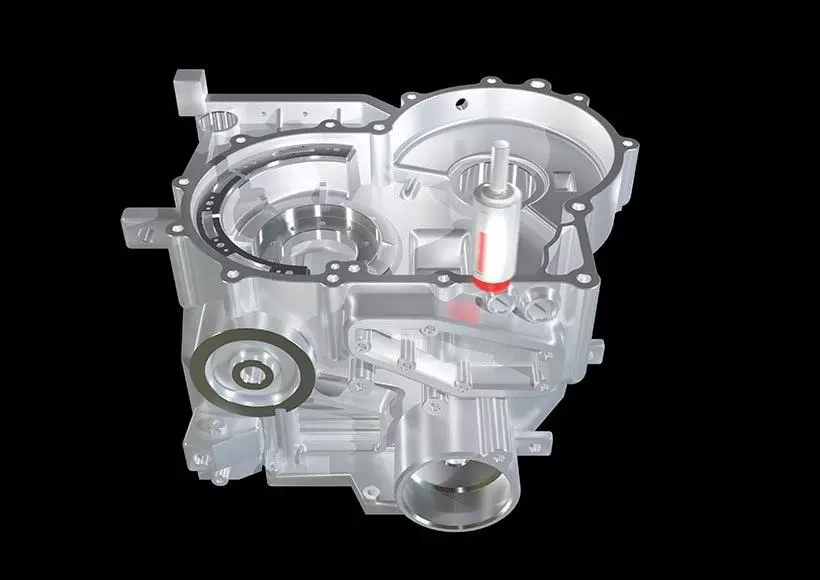
The deburring process is crucial for ensuring the proper functionality and longevity of transmission cases. In this process, the matching surface after the face milling process is treated to remove any burrs or roughness. To achieve this, XEBEC Brush Surface (A11-CB40M) is used as a tool with a spindle speed of 2,160 min-1, a table feed of 7,000 mm/min, and a depth of cut of 0.5 mm. These processing conditions ensure that the surface of the transmission case is deburred effectively and can function properly.
Before and After Deburring Transmission case


Injector Body (Nozzle)

The injector body, also known as the nozzle, is a critical component in fuel injection systems. After the drilling process, the edge face of the injector body may have burrs that can affect the performance of the engine. To remove these burrs, XEBEC Brush Surface (A11-CB15M) and XEBEC Floating Holder (FH-ST-12) are used. The spindle speed for this process is set at 2,000 min -1, and a depth of cut of 4mm is applied. With these processing conditions, the injector body can be deburred efficiently and effectively, ensuring optimal performance of the fuel injection system.
Before and After Deburring Injector Body


Cylinder Head

The Cylinder Head is an essential part of an engine that performs many functions. After the face milling process, there are often burrs left on the matching surface, which can negatively impact the overall quality of the component. To remove these burrs, deburring is necessary. In this process, the XEBEC Brush Surface (A11-CB100M) is used to deburr the surface of the cylinder head. The spindle speed used for this process is 1,350 min-1, with a table feed of 2,000 mm/min and a depth of cut of 0.5 mm. This ensures a smooth and burr-free surface, enhancing the performance and longevity of the cylinder head.
Before and After Deburring Cylinder Head


Reduction Gear
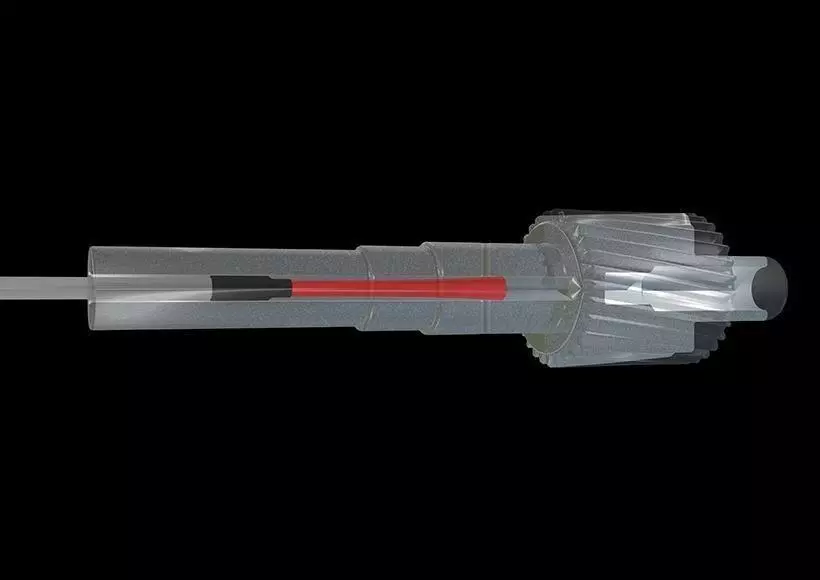
Crosshole deburring is an important process that ensures smooth operation of mechanical components such as the Reduction Gear. XEBEC Brush Crosshole (CH-A12-3L) is an effective tool used to deburr crossholes after drilling processes. The processing conditions for the tool include a spindle speed of 10,800 min -1 and a table feed of 300 mm/min. By using this tool and following the recommended processing details, manufacturers can achieve a high-quality surface finish, reduce production time, and ensure the longevity and reliability of their mechanical components.
Reliable Automotive Parts Testing with Non-Destructive Techniques
Ensuring the quality of automotive components is crucial since it can be challenging to detect defects after assembling a vehicle. Therefore, various components need to undergo testing to ensure standard quality before assembling. Non-Destructive Testing (NDT) techniques are used to accomplish this without damaging the test specimen. The automotive industry has advanced NDT techniques that can detect defects in the workpiece. These techniques include Penetration Testing (PT), Eddy Current Testing (ECT), Magnetic Particle Inspection (MPI), Ultrasonic Testing (UT), and Laser Holographic Inspection. Penetration testing is particularly useful in detecting surface defects in non-porous workpieces, such as small cracks in rims, suspension, and steering components. The process involves ultrasonic cleaning, spraying the component with a coloured penetrating liquid, which penetrates into any holes or cracks, and then inspecting the component for defects.
Meeting High Cleanliness Standards in the Automotive Industry with Precision
The quality of a vehicle depends largely on the quality of its parts, and automotive industries must adhere to strict standards of excellence to ensure superior performance. Fitting tolerances and cleanliness are crucial factors that must be considered, as they play a significant role in the longevity and durability of the components.
Even the presence of the slightest foreign particle can disrupt the functioning of an automobile, negatively impacting its assembly. Residues from various machining processes can weaken the structural strength of components, ultimately shortening their lifespan. Therefore, after machining operations, it is crucial to thoroughly clean components to prevent unwanted contamination in the assembled parts. High finishing and cleaning standards are required for components such as crankshafts, camshafts, cylinder walls, pistons, injectors, valves, hydraulic systems, and others.
In the 2000s, the automotive industry introduced two standards, ISO 16232 and VDA 19, to ensure the cleanliness of various parts in the engine, transmission, suspension, steering systems, and other components. The cleaning process typically involves using a cleaning fluid and ultrasonic cleaning method.
